Essential Video Cuts Every Editor Should Know
Are you aware that there are different types of cuts that you can use when you connect one video clip to another?
More importantly, did you know that the cuts that you choose to use will affect the pace and flow of the video, and could even provide additional visual meaning to some clips?
The fact of the matter is that there are several important types of video cuts that everyone should know if they are going to edit videos:
Hard cut
The hard cut is basically just a basic cut where you simply cut from one clip to the next without any additional visual meaning.
It can be a bit jarring, which is why it is best to use it in situations where there is no need for additional contexts – such as when cutting between perspectives in the same scene.
Jumpcut
When using a jump cut you will cut from a point in one clip to a point further along in the same clip (or in a clip that is visually similar).
Because of the similarity between both clips, the people and objects that are different will seem to suddenly jump to different positions.
As you can imagine that makes jump cuts very jarring, and means they should be used with extreme care.
Typically it is best only to use them for a specific effect – such as to show repetition of the passage of time.
Cut on action
One of the smoothest ways to cut a video is by using the cut on action. It involves cutting from a clip that has a certain action being performed, and to a clip that shows that same action being continued.
Because the viewer will be watching the action – they are less likely to take note of the cut itself. In other words, the cut on the action will allow you to hide the cut, and make the video flow more smoothly.
L-cut and J-cut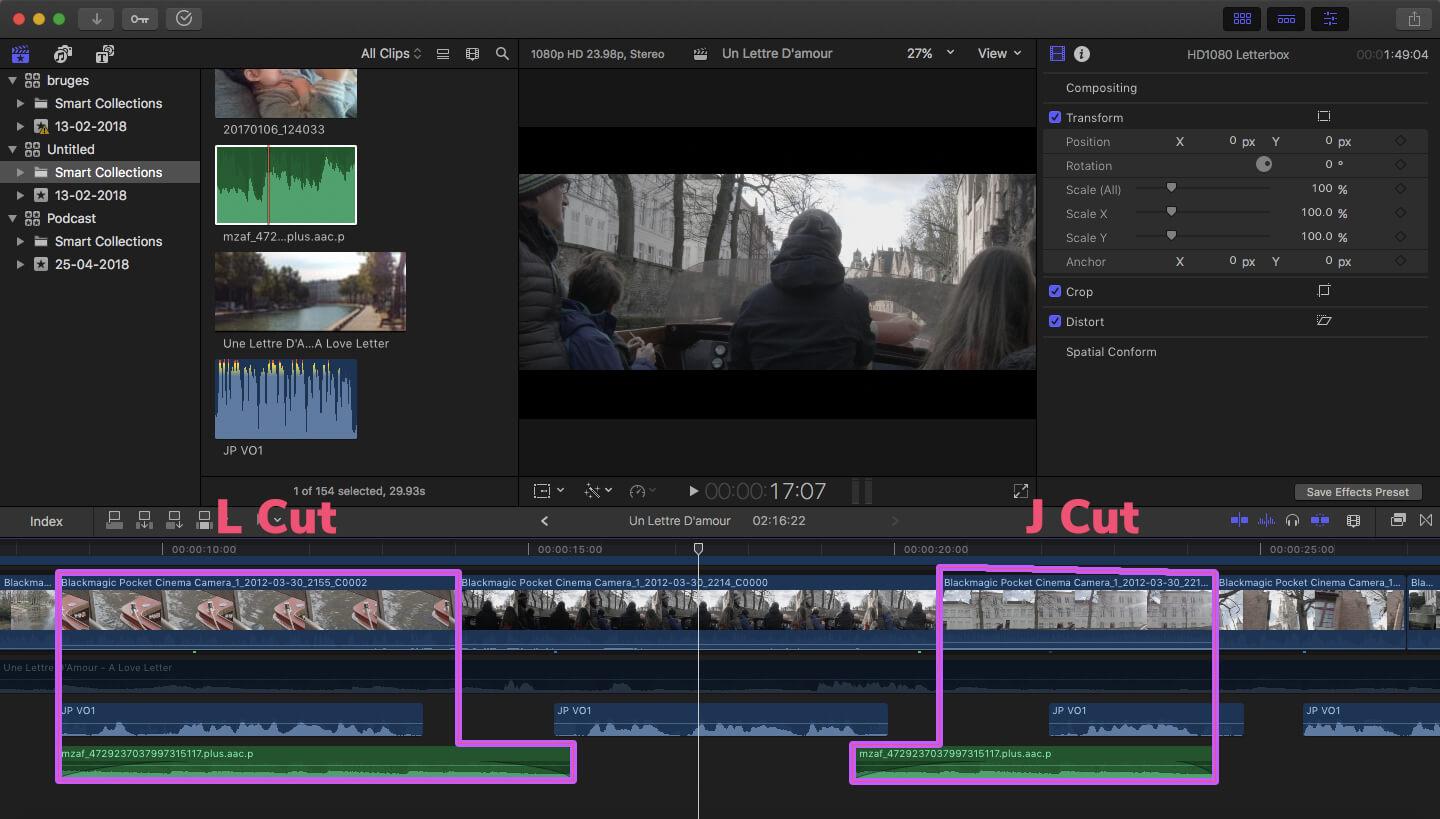
The L and J cuts are types of cuts that involve cutting the audio. In the L cut you will cut from one clip to the next, but continue to play the audio from the first clip for a short while.
On the other hand, the J cut is the reverse, and you’ll hear the audio from the next clip a few seconds before the video cuts to it.
Both of these cuts are extremely useful in a variety of situations. In particular, they will let you cut together a conversation more effectively, as you can shift perspectives without interrupting its flow.
Cutaways
True to its name a cutaway will cut away from the main scene and to a clip in a different setting. It is used to provide additional visual context to a scene and add emphasis to details that may otherwise escape the attention of viewers.
Another useful way to take advantage of cutaways it to use them to mask jump cuts. In other words, instead of using a direct jump cut, inserting a cutaway in between will avoid the excessively-jarring nature of the jump cut.
As you can see each one of the cuts has an important role to play and can be used in a wide range of different types of videos. That is why it helps to know them – but to actually get a better idea of the impact that they have you should use them in your videos.
To be honest you can use any video editor to cut together videos using the ways described above. It helps if it has a timeline however, to make it easier to position and time the cuts the way that you want.
For example, you could use Movavi Video Editor if you need an easy way to combine MP4 files or videos in other formats.
Once you understand how each cut will affect your video, it will be easier for you to identify how and when to use it.
With practice, you will find that you’re able to control the pace and flow of your video much better, include additional visual meaning, and prevent viewers from getting distracted by how jarring some of your cuts may be.
